Ally integrates with Blackboard to provide individualized feedback on the accessibility of the content within your course. For your convenience, here is an explanation and demonstration video of Ally.
▸Course Accessibility Report
Open your Blackboard course, and on the right side navigation is the Books and Tools. This is where you will find the Accessibility Report for Ally. Click the indicator to view your accessibility feedback. Follow along with Ally's step-by-step guide to improve your original file.
Alternative Formats
Ally automatically scans your original content and performs a series of steps to create alternative formats to make the content more accessible. The "Alternative Formats" are available for download to you and your students by clicking the Ally drop-down arrow next to your course file. Your original file will not be affected by the alternative formats.
Additional resources:
▸Add Headers to a Document
- Open the file on your computer
- Select the text you want to turn into a heading
- Go to the home tab and choose the heading from the styles group
- Heading 1 is for a title
- Heading 2 is for sections
- Heading 3 is for subsection
- Save the file
Microsoft Add a heading in a Word document support page
▸Add Image Descriptions
Ally checks for image descriptions anywhere there is an image. This includes image files and files that include images. For example, a document or presentation.
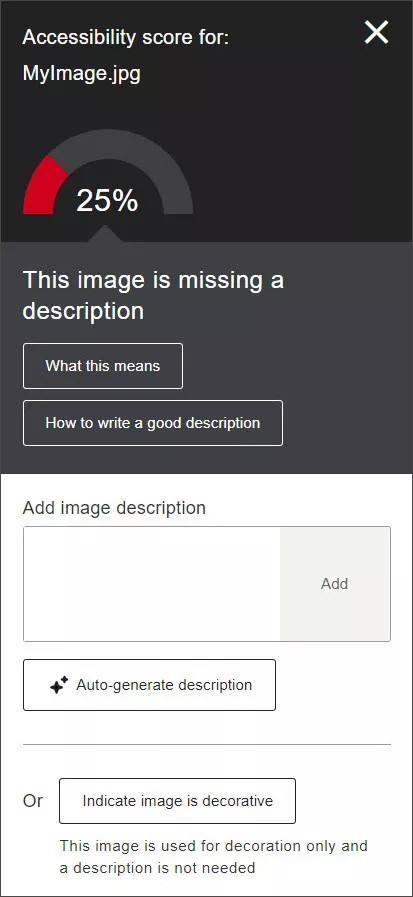
When you’re ready, add your image description to the text field in the instructor feedback panel and select Add. If your image is only for visual effects, and doesn't contain information relevant to the learning content, select Indicate image is decorative.
▸Tag a PDF
You need to fix this issue in the original source file. For example, in Microsoft® Word. Open the file, save as a tagged PDF, and upload the updated file to your course. Select How to tag a PDF for step-by-step guidance on how to do this.
-
Select How to tag a PDF and select Yes.
-
Open the source file on your computer.
-
Save the file as a tagged PDF.
-
Microsoft Word: Select File and Save As. Select PDF from the File Format menu. Select Best for electronic distribution and accessibility and select Export.
-
PowerPoint: You can't save PowerPoint files as tagged PDFs.
-
LibreOffice Writer and Impress: Select File and Export as PDF. Select Tagged PDF (add document structure) and Export bookmarks in PDF Options. Select Export.
-
Upload the updated file to your course.
Adobe Pro-Tags
Adobe tags full support page.
Add tags in a document
To include tags in a document:
-
Select All Tools > Prepare for accessibility.
-
Select Automatically tag PDF. Acrobat includes the tags in the document, and a right panel displaying tags is opened.
-
Use the Accessibility tags panel to review and edit the tags.
View tags in the Tags panel
-
Choose the hamburger Menu (Windows), or the View menu (macOS) > Show/Hide > Side Panels > Tags.
-
Do one of the following:
Edit tags with the Tags panel
You can edit a tag title, change a tag location, or change the tag type for an element. All page content must be tagged, marked as an artifact, or removed from the logical structure tree.
Edit a tag title
-
In the Tags panel, expand the section of the logical structure that you want to edit.
-
To edit the title, Select the tag, choose Properties from the Options menu, enter text in the Title box, and click Close.
Move a tag
-
In the Tags panel, expand the Tags root to view all tags.
-
Select the Tag icon of the element that you want to move.
-
Do one of the following:
-
Drag the tag to the location that you want. As you drag, a line appears at viable locations.
-
Choose Cut from the Options menu, and select the tag that appears above the location you want to paste the cut tag. From the Options menu, choose Paste to move the tag to the same level as the selected tag. Or choose Paste Child to move the tag within the selected tag.
Change the element type
-
In the Tags panel, expand the section of the logical structure that you want to change.
-
Select an element and choose Properties from the Options menu.
-
Choose a new element type from the Type menu, and then click Close.
Add alternate text
To add alternate texts to your document, make sure that the document is tagged. Learn how to Autotag a document.
-
Open a PDF. From the Global bar in the upper-left select All tools.
-
From the left panel, select Prepare for accessibility > Add alternate text.
-
You will receive a dialog with the message Acrobat will detect all figures in this document and display associated alternate text. Select OK.
-
In the Set Alternate Text dialog box, enter the alternate text and select Save & Close.